
뉴멕시코 대학의 Greg Heileman 교수의 코세라 강좌인 Web Application Architectures를 수강한 내용을 정리해 보았다. 루비도 잘 모르고, 레일즈도 잘 모르는 상황에서 기록을 위해 정리했고, 번역에 시간을 들일 상황이 없어서 그냥 영문으로 남겨버린 경우도 많아서 읽는 분들한테는 좋은 포스팅이 되지는 않는 것 같다. 지송ㅎㅎ 간략하게 살펴보고 위 강좌의 링크에서 직접 강연을 듣는 것이 좋을 것 같다. 대체적으로 강의 내용이 쉽고 친절하게 진행되기 때문에 루비와 레일즈 초보자에게는 괜찮은 강좌라고 생각된다.
루비 언어에 대한 부분은 글이 너무 길어져 며칠 전 루비 언어 기초로 별도 정리하였다.
Design Pattern
디자인 패턴이란 특별한 맥락 안에 있는 일반적인 디자인 문제를 풀기위해 객체와 클래스의 상호작용에 대해 설명하는 것이다.
디자인 패턴은 계속해서 재사용할 수 있는 추상적인 템플릿이다.
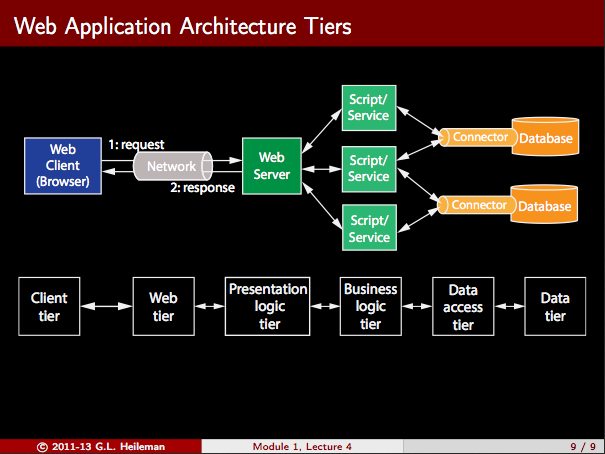
3-Tier Architecture
- Presentation tier : User’s web browser.
- Application (logic) tier : The web server and logic associated with generating dynamic web content, e.g., collecting and formatting the results of a search.
- Data tier : A database.
6-Tier Web Application Architecture
The Application tier is often subdivided into two tiers:
- Business logic tier : Models the business objects associated with the application, e.g., accounts, inventories, etc., and captures the business rules and workflows associated with how these processes can be processed and manipulated.
- Data access tier : Responsible for accessing data, and passing it to the business logic tier, e.g., account balances, transactions, etc.
The Presentation tier is often subdivided into two tiers:
- Client tier : client-side user interface components.
- Presentation logic tier : server-side scripts for generating web pages.
Finally, the web server is often separated out into its own Web tier.
루비온 레일즈 설치
강좌에서 Install Rails를 바로 링크하고 있다. 꼼꼼하고 친절하게 작성된 문서이며, 덕분에 쉽게 설치할 수 있었다. 맥에서 설치하였으며 간단히 그 과정을 요약했다. 잘 안될 경우에는 Install Ruby on Rails 4.2 · Mac OS X의 자세한 설명을 참고한다.
Xcode가 이미 설치되어 있는지 확인한다.
xcode-select -p
/Applications/Xcode.app/Contents/Developer
- 만약 결과가
/Applications/Apple Dev Tools/Xcode.app/Contents/Developer로 나타난다면 Xcode를 지우고 다시 설치해야한다.
RVM은 Homebrew를 요구하므로 Homebrew를 먼저 설치한다.
ruby -e "$(curl -fsSL https://raw.githubusercontent.com/Homebrew/install/master/install)"
RVM을 설치한다.
\curl -L https://get.rvm.io | bash -s stable --ruby
- RVM 설치 관련 한글 추천글: 멘붕없이 RVM과 루비 설치하기
RVM을 최신판으로 업데이트하고 Ruby를 설치한다.
rvm get stable --autolibs=enable
rvm install ruby
rvm --default use ruby-2.2.0
RubyGems의 버전을 체크하고 업데이트 한다.
gem -v
gem update --system
빠른 Gem 설치를 위해 도큐먼트를 설치하지 않게 할 수 있다.
echo "gem: --no-document" >> ~/.gemrc
Nokogiri를 설치한다.
gem install nokogiri
최신 안정판 Rails를 설치한다.
rvm use [email protected] --create
gem install rails
rails -v
프로젝트 디렉토리에 gemset를 만들고 레일즈를 설치하고 새 앱을 만드는 방법은 다음과 같다:
mkdir myapp
cd myapp
rvm use ruby-2.2.0@myapp --ruby-version --create
gem install rails
rails new .
-
--ruby-version옵션은 루트 디렉토리에.ruby-version과.ruby-gemset화일을 만든다. RVM이 앱의 루트 디렉토리에 있는 이 파일을 인식하고 Ruby 버전과 gemset을 로드한다. 초보자에게 추천되는rails new myapp명령보다는 이런 접근이 더 쉽다.(그러나 설치 문서와 달리 본 강의에서는rails new myapp으로 가르친다:;)
잘 작동하는지 점검하기 위해 smoke test를 한다.
rake -T
RVM을 사용하면 rake 대신 bundle exec rake를 실행할 필요가 없다.
웹서버를 실행하고:
rails server
웹브라우저에서 http://localhost:3000를 열면 레일즈 초기 화면이 등장한다.
레일즈 기본 디렉토리 구조
.   RAILS.root
├── app         : Model/View/Controller 코드
├── bin         : Helper 스크립트(bundle, rails, rake)
├── config      : App, database, route 환경설정
├── db          : Database schema and migration
├── *Gemfile*   : 요구되는 gem을 지정
├── lib         :
├── log         : 앱 로그
├── public      : 앱의 웹루트
├── test        : 테스트
├── tmp         :
└── vendor      :
참고 링크
- 루비 설치하기
-
[멘붕없이 RVM과 루비 설치하기 Bigmatch](http://bigmatch.i-um.net/2013/12/%EB%A9%98%EB%B6%95%EC%97%86%EC%9D%B4-rvm%EA%B3%BC-%EB%A3%A8%EB%B9%84-%EC%84%A4%EC%B9%98%ED%95%98%EA%B8%B0/) - Install Rails On Mac OS: 국내 RoRLab 동영상
블로그 만들기
동작하는 블로그를 만들기 위해서는 다음 명령어를 순서대로 입력하면 된다:
rails new blog
cd blog
bundle install
rails generate scaffold post title:string body:text
rails generate scaffold comment post_id:integer body:text
rake db:migrate
rake routes
rails server
http://localhost:3000/posts#index에서 첫번째 포스트를 입력한다. http://localhost:3000/comments에서 댓글을 입력할 수 있다.
블로그 데이타 베이스가 생성되었는지 살펴보는 툴을 소개한다:
CRUD
– Create – Read – Update – Destroy
Rails philosophy is based upon three principles:
- Convention over Configuration : Common aspects of a web application are provided (i.e., preconfigured) for you, so use them, rather than fight against them! Ideally, the developer should only have to specify the unconventional aspects of the application.
- Don’t Repeat Yourself (DRY) : Every piece of information should have a single, unambiguous, authoritative representation within a system. Duplication of code fragments throughout an application can lead to logical contradictions, and in general make the application more difficult to maintain.
- Agile Development : Software development methodologies based on iterative and incremental development, where requirements and code evolve with minimal planning through self-organizing, cross-functional teams
레일즈에 대한 더 자세한 설명은 공식문서 Ruby on Rails 가이드를 살펴보는 것도 좋다.
Git
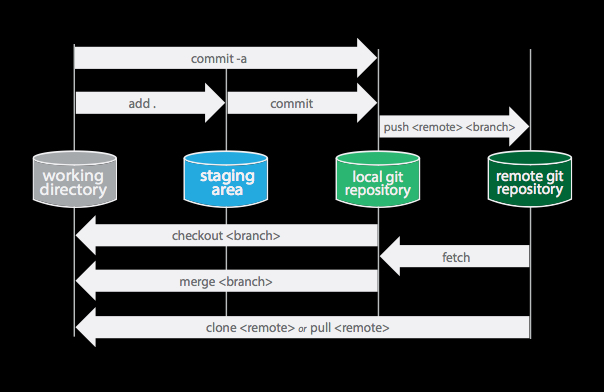
git init
위의 깃 초기화 명령을 실행하면 깃에서 레일즈 디렉토리를 인식해서 다음과 같이 제외할 파일을 미리 설정해준다.(오떰!)
# See https://help.github.com/articles/ignoring-files for more about ignoring files.
#
# If you find yourself ignoring temporary files generated by your text editor
# or operating system, you probably want to add a global ignore instead:
#   git config --global core.excludesfile '~/.gitignore_global'

# Ignore bundler config.
/.bundle

# Ignore the default SQLite database.
/db/*.sqlite3
/db/*.sqlite3-journal

# Ignore all logfiles and tempfiles.
/log/*
!/log/.keep
/tmp
변경 사항을 추가하고 커밋한다.
git add .
git commit -m "2nd commit"
위의 두 명령어를 한번에 실행할 수도 있다.
git commit -a -m "2nd commit"
깃에 대한 내용은 제 블로그의 완전 초보를 위한 깃허브를 참조한다.
Relational Database
- schema : The structure/organization of the tables in a database
- entity-relationship model is a common way of abstractly capturing a database schema
MySQL Workbench와 같은 툴 등을 이용하여 EER Diagram(enhanced entity relationship diagram)에 익숙해질 필요가 있다.
Rails Databases
- Development
- Test
- Production
rails server 명령은 개발자 모드에서 레일즈를 실행한다. 다른 모드로 실행하려면:
rails server -e production
레일즈에 포함된 인기있는 프로덕션 데이타베이스는 PostgreSQL와 MySQL이다.
각각의 모드에서 사용하는 레일즈 데이터베이스는 db/database.yml에서 지정한다.
Active Record Design Pattern
Active Record pattern은 관계형 데이터베이스에 저장된 데이터를 접근할 때 사용된다. 특정 데이터베이스(SQLite, MySQL, PostgreSQL, SQL Server, Oracle 등)에 대한 걱정없이 CRUD 작업을 수행한다.
-
There’s a big problem: The classes and objects associated with an OO language are incompatible with the structure of relational databases.
-
Active Records to the Rescue: This design pattern encapsulates that notion an object-relational mapping (ORM), i.e., a mapping between OO language constructs and relational databases constructs.
The ORM provided by Active Records automatically converts object into constructs that can be stored in a database (and converts them back upon retrieval).
This creates, in effect, a “virtual object database” that can be used from within an OO language
Active Records in Ruby
The Active Record design pattern is provided in a Ruby module called ActiveRecord.
Using the functionality provided by this module you can: – Establish a connection to a database. – Create database tables. – Specify associations between tables that correspond to associations between the Ruby classes. – Establish an ORM between Ruby classes/objects/attributes and the tables/rows/columns in the underlying database. – Peform CRUD operations on Ruby ActiveRecord objects.
The ActiveRecord module is built into Rails – the functionalities above are utilized when you create a Rails app and run scaffold and model generators.
The ActiveRecord::Base.establish_connection method uses the information in ./conifg/database.yml in order to connect a Rails application to a database.
The ActiveRecord::Migration object is used to incrementally evolve your database schema over time – migrations update the ./db/schema.rb file.
The ActiveRecord::Schema.define method, in ./db/schema.rb, is created by inspecting the database and then expressing its structure programmatically using a portable (database-independent) DSL. This can be loaded into any database that ActiveRecord supports
ActiveRecord Module
If you create a new class by inheriting ActiveRecord::Base, and call it Post, it is assumed a database table will exist that is called posts. I.e., it pluaralizes the name of the class, and then looks for a table with that name.
The Base class in the ActiveRecord module will inspect the posts database, and determine that it has title and body fields, and it will automatically add member variables (and accessors) with these same names in the
Post class. I.e., it takes care of the ORM!
Furthermore, a query interface is also provided – in most cases, ActiveRecord insulates you from the need to use SQL.
Ex.
Post.all
Post.first
Post.find_by(1)
Post.find_by_title("My First Post")
Associations
| Relationship | Model with no foreign key | Model with foreign key |
|---|---|---|
| one-to-one | has_one | belongs_to |
| many-to-one | has_many | belongs_to |
| many-to-many | has_and_belongs_to_many | * |
/models/post.rb에서
has_many :comments, dependent: :destroy
/models/comments.rb에서
belongs_to :post
를 추가하여 두 개의 모델을 연결하고, 포스트가 지워지면 댓글도 지워지도록 한다.
rails console을 실행한 후:
p = Post.all
p[0].comments
p[0].comments.size

Comment.all
p[1].destory
Comment.all
Post.all
rake routes로 현재의 URL을 확인해보면 포스트와 댓글이 따로 되어있다. 포스트 다음에 댓글이 오도록 하려면:
/config/routes.rb에서 다음과 같이 변경한다:
Rails.application.routes.draw do
  resources :comments
  resources :posts do
    resources :comments
  end
이제 rake routes로 확인해보면 post_id/comments와 같이 URL이 생성된다.
Data Validation
Data Validation은 사용자의 유효한 입력을 유도하기 위해서도 필요하지만, 일반적인 웹앱의 보안 약점인 SQL injection, cross-site scripting, buffer overflow attacks 등을 피하기 위해서도 필요하다.
ActiveRecord Callbacks
ActiveRecord 객체는 라이프 사이클의 다양한 국면에서 integrity를 확실하게 하도록 호출 매서드를 갖는다.
Ex.
– Don’t create a new user object if the user already exists in the
database.
– Ensure that all of an object’s attributes are valid before allowing it to
be saved to the database.
– When destroying an object, destroy all of the objects that depend on it
Callbacks은 객체의 변화가 있을 때 작용되는 매서드이며, 일종의 훅이다.
ActiveRecord Validations
Validations는 ActiveRecord 콜백의 하나이며, model에서 정의된다.
예를 들면:
class Person < ActiveRecord::Base
validates_presence_of :name
validates_numericality_of :age, :only_integer => true
validates_ confirmation_of :email
validates_length_of :password, :in => 8..20
/models/post.rb에서
validates_presence_of :title
validates_presence_of :body
/models/comment.rb에서
validates_presence_of :post_id
validates_presence_of :body
를 삽입하고, rails server를 실행하여, 확인한다.
Ruby
루비 언어 기초에 별도로 정리하였다.
Middleare
미들웨어는 클라이언트-서버 구조에서 OS와 앱 사이의 소프트웨어 접착제이다.
레일즈 미들웨어는 일종의 미들웨어 스택인 Rack이다. Rack은 웹서버(Mongrel, Thin, Phusion, Apache 등)와 대화할 수 있는 간결하고 통일된 인터페이스를 제공한다. 즉, Rack은 HTTP 요청과 응답을 핸들링한다. Rack::Builder는 웹앱에서 사용하는 스택과 같은 구조를 만든다. 레일즈 앱에 설치된 미들웨어를 보려면 앱의 루트에서 다음 명령어를 친다:
rake middleware
Sinatra 같은 다른 루비 프레임워크도 Rack 기반이다. 시내트라는 데이타베이스 백엔드 지원이 필요없을 경우 좋은 선택이다.
rails server를 실행하면 Rack::Server 객체가 만들어지고 웹서버(기본적으로 WEbrick)가 로드되며, 뒤이어 미들웨어 부분이 로드된다. Rack::Server#start 매서드는 웹서버를 가동하기 시작하고 HTTP 요청을 지정된 포트에서 기다린다.
The Hypertext Transfer Protocol (HTTP)
HTTP - Client Side
HTTP/1.1 request 메시지는 세 부분으로 구성된디:
- Request line
- Header
- Message body
Request Line
request line은 리소스를 지정하고, 적용될 액션(또는 request, verb, method로 불린다)이 뒤따른다. 리소스는 Universal Resource Identifier (URI)로 지정한다. 주석: Uniform Resource Locator (URL)는 URI의 특정 형태이다.
아홉 가지의 request 형태가 있다.
- HEAD - the response the resource would supply to a GET request, but without the response body.
- GET – return a representation of the resource.
- POST – submit data (e.g., from an HTML form) to the resource, where the data is supplied in the body of the request, and the result may be the creation of a new resource, or the update of an existing one.
- PUT – submit a representation of the resource.
- DELETE – delete the resource.
- TRACE – Echoes back the received requested (the client can use this to see if any changes were made by intermediate servers).
- OPTIONS – returns the HTTP methods that the server supports for the specified resource.
- CONNECT – converts the request connection to a transparent TCP/IP tunnel (usually to facilitate SSL through HTTPS).
- PATCH – apply partial modifications to a resource.
HEAD, GET, OPTIONS, TRACE는 안전 매서드로 불린다. 안전 매서드는 서버에 다른 영향을 미치지 않는다. 즉, 이 매서드들은 정보 검색만을 의도하며 서버 상태를 변화시키지 않는다.
주석: 안전한 방법으로 GET 매서드가 적용될 때에는 브라우저는 웹앱의 상태에 대한 걱정 없이 임의의 GET 요청을 만들 수 있다. 게다가 그것들은 캐시된다.
POST, PUT, DELETE 매서드는 서버 상태에 영향을 준다. PUT과 DELETE 매서드는 멱등idempotent이어야 한다. 이것은 여러 동일한 요청이 한번의 요청과 같은 효과를 가져야 한다는 것을 의미한다.
안전 매서드도 서버 상태를 변경시키지 않기 때문에 멱등이다.
Header
HTTP 메시지 헤더는 HTTP 요청의 첫번째 부분이다. It contains the operating parameters of an HTTP request. Header fields start with the field name, followed by a colon, and then the field value. E.g., the Accept field specifies the content types that are acceptable to the client. Ex. Accept: text/plain
The Accept-Language header specifies the languages that are acceptable to the client. Ex. Accept-Language: en-US
Field names and values may be any application-specific strings, but a core set of fields is standardized by the Internet Engineering Task Force (IETF).
HTTP 메시지 헤더는 메시지 바디와 공란으로 나누어져야 한다.
Message Body
메시지 바디는 선택적이다. 메시지 요청에서 메시지 바디는 대체로 유저가 입력한 데이터나 서버로 업로드하는 화일이다.
바디가 있는 HTTP 요청은 헤더 라인에 바디를 기술한다.
Ex.
The Content-Type: specifies the MIME-type of the data in the message body, such as text/html or image/gif.
The Content-Length: specifies the number of bytes in the message body.
HTTP - Server Side
HTTP/1.1 응답 메시지는 요청 메시지와 비슷하고, 다음 세 부분으로 이루어진다:
- Response line
- Header
- Message body
After delivering the response, the server closes the connection (the default behavior with HTTP 0.9 and 1.0). With HTTP 1.1, a persistent connection is assumed by default.
Response Line
서버가 제공하는 응압의 첫번째 줄이며, status line이라고 불린다. status line은 세부분으로 이루어진다:
- The HTTP version, in the same format as in the message request, e.g., HTTP/1.1.
- A response status code that provides the result of the request.
- An English reason phrase describing the status code.
Ex.
HTTP/1.1 200 OK HTTP/1.1 404 Not Found
The status codes associated with the status line belong to done of five categories:
- 1xx (Provisional Response) - A provisional response that requires the requestor to take additional action in order to continue. e.g., 100, the Continue status code, indicates that the requester should continue with the request. 101, the Switching Protocols status code, the requestor has asked the server to switch protocols (e.g., HTTPS) and the server is acknowledging that it will do so.
- 2xx (Successful) - The server successfully processed the request.
- 3xx (Redirected) - Further action is needed to fulfill the request. Often, these status codes are used for redirection.
- 4xx (Request Error) - There was likely an error in the request which prevented the server from being able to process it.
- 5xx (Server Error) - The server had an internal error when trying to process the request.
Header
The header fields in the response allow the server to pass additional information about the response which cannot be placed in the status line.
These header fields have the same format as in the request, and give information about the server and about further access to the resource identified by the request URI.
Example response fields in the header include:
Accept-Ranges – Allows the server to indicate its acceptance of range requests for a resource. Age – Sender’s estimate of the amount of time since the response was generated at the origin server. Location – Used to redirect the recipient to a location other than the request URI for completion of the request or identification of a new resource. Proxy-Authenticate – Allows the client to identify itself (or its user) to a proxy which requires authentication.
Message Body
The message body in the response must also be preceded by a blank line.
The response to a HEAD request does not include a message body. All other responses do include a message body, although it may be of zero length.
The requested resource, e.g., the actual HTML, is included in the message body of the response.
HTTP Secure
The HTTP Secure protocol (HTTPS) is a combination of the HTTP and SSL/TLS protocols. Thus, it makes use of the public key infrastructure.
HTTPS enhances the HTTP protocol by providing encrypted communication and secure web server identification.
The HTTPS protocol is often used for processing payments in web applications, or for handling other sensitive transactions.
The trust associated with HTTPS is based on the major certificate authorities, whose software comes pre-installed in the browser. I.e., what is really happening is that your browser must trust some certificate authority (e.g. VeriSign/Microsoft/etc.) so that it can tell your browser whom it should trust.
HTTPS URLs begin with “https://…” and uses port 443 by default.
The Model-View-Controller Design Pattern
미들웨어에 적용되는 MVC 아키텍처 다자인 패턴은 많은 웹앱 프레임워크에서 사용되며, 최근 웹앱의 복잡함을 다루는 방법으로 소개되어 왔다: – Decouples data (model) and presentation (view). – A controller handles requests, and coordinates between the model and the view. – More robust applications, easier to maintain.
The MVC design pattern is an architecture-level design pattern that is actually a collection of design patterns:
Model – The domain-specific representation of the data over which the application operates, with domain logic that adds “meaning” to raw data. A database is often used to store the data.
View – Renders the model in a view suitable for interaction, typically via a user interface. Multiple views can be created for a single model, each serving different purposes.
Controller – Mediates between the model and the view.
Although there are different varieties of MVC, the control flow is generally:
- The user interacts with the user interface in some way (for example, by pressing a button).
- The controller handles the input event from the user interface, often via a registered handler or callback, and converts the event into an appropriate user action, understandable for the model.
- The controller notifies the model of the user action, possibly resulting in a change in the model’s state. E.g., the controller may update the user’s account information.
- A view queries the model in order to generate an appropriate user interface (e.g., the user’s account information). The view gets its own data from the model. In some implementations, the controller may issue an instruction to the view to render itself. In others, the view is automatically notified by the model of changes in state (Observer design pattern) that require a screen update.
- The user interface waits for further user interactions, which restarts the control flow cycle.
Rails Controllers–Request Handling
Action Pack
레일즈 안에 있는 루비 ActiveRecord 모듈에 의해 모델(MVC에서 ‘M’)이 지원되는 방법에 대해 이미 검토해 보았다.
레일즈에서 뷰와 컨트롤러는 Action Pack으로 지원되는데, 다음 세 가지 루비 모듈로 구성된다: ActionDispatch, ActionController and ActionView.
컨트롤러는 레일즈 앱의 심장이다. – when a user connects to your Rails application, they do it by asking the application to execute a controller action. How does Rails determine the controller action it will execute?
Dispatcher
When an HTTP request is made to a Rails application, the ActionDispatch module is used to map that request to a particular controller action.
Requests are mapped to controller actions via the routes defined in ./config/routes.rb file.
We already seen that you can view the routes defined in your application by executing: $ rake routes
To connect a request to a controller action, you add a route to ./config/routes.rb.
Examples of the various ways you can do this are provided as comments in that file.
Ex. Adding the following to ./config/routes.rb:
get ’products/:id’ => ’catalog#view’
다음 URL을 사용하는 GET 요청을 매핑한다:
http://localhost:3000/products/10
to the view method in the CatalogContoller class, assigning the value 10 to the params[:id] hash that will be made available to all methods in that class.
This doesn’t look like the syntax used by the scaffold generator to create the routes for our posts and comments: resources :posts resources :comments
RESTful Controllers
By default, Rails controllers are RESTful and therefore use resource routing.
REST stands for Representational State Transfer.
The fundamental philosophy behind REST is that clients should communicate with servers through stateless connections, where:
– Long term state is kept on the server side by maintaining a set of identifiable resources, posts and comments in our case.
– The client can access these resources (perform CRUD operations on them) through a highly limited but uniform interface (a set of URLs in our case).
– Computation proceeds by identifying the resource and the CRUD operation you’d like to perform on it.
A REST-based web application can be contrasted to a RPC(remote procedure call)-based web application. – In RPC-based applications, clients send requests to servers, asking them to execute a specified procedure (available on the server) using the supplied parameters. The server must advertise the services it offers. SOAP is a protocol, developed by Microsoft, that supports this approach. – REST assumes a simple set of verbs (controller actions/methods) that can operate over a rich set of nouns (resources). – RPC allows for arbitrary complexity on the server side.
The constraints imposed by REST can lead to web applications that easier-to-write and maintain. Rather than implementing remotely accessible services, a simple interface for performing CRUD operations on resources is provided.
The Programmable Web, which treats the WWW as a vast collection of addressable resources, is greatly facilitated by REST.
Resourceful Routes
The statement in ./config/routes.rb:
resources :posts
produces seven different routes in your application, all mapping to methods in the PostsController class:
| HTTP Verb | Path | Method | Purpose |
|---|---|---|---|
| GET | /posts | index | dispaly all posts |
| GET | /posts/new | new | return form for creating a post |
| POST | /posts | create | create a new post |
| GET | /posts/:id | show | display a specific post |
| GET | /posts/:id/edit | edit | return form for editing a post |
| PATCH/PUT | /posts/:id | update | update a specific post |
| DELETE | /posts/:id | destroy | delete a specific post |
Rails Controllers — Request Processing
In the last lecture we say how the dispatcher routes a request to a particular controller action (method). Ex. The HTTP GET request
http://localhost:3000/posts/1
will route to the show method in the PostsController class, passing params[:id] with a value of 1 to the controller. Note: this class is defined in the file:
./app/contollers/posts_controller.rb
Next, the show method will use the ActiveRecord#find method to retrieve the post with id=1 from the database, and assign it to the instance variable @post.
Finally, the controller will pass @post to the view, i.e., to the template file:
./app/views/posts/show.html.erb
and this will be used to create the HTML that will be sent to the browser.
Filters
The PostsController#show method is defined as follows:
    # GET /posts/1
    # GET /posts/1.json
    def show
    end
It doesn’t retrieve the post!
The desired post is actually retrieved from the database using a filter called set_post.
Filters allow controllers to run shared pre and post processing code over their methods.
Sessions
In general, the “state” of an application which needs to persist across requests should be stored in the database. E.g., posts and comments are persisted in the database.
There are times when data needs to be persisted differently. E.g., the current contents of a shopping cart.
Whenever a user connects to a Rails application, a session is created.
Session data is stored in Rails using a hash structure that persists across requests, and can be accessed by controllers.
Ex. session[:current_user] = user.id
A flash hash is part of the session that is cleared with each request (its value is made to the next request). A controller can use this to send a message that can be displayed to the user on the next request. Ex. flash[: notice] = ‘Post was successfully created.’
Response – Rendering HTML or JSON
The request: http://localhost:3000/posts/1 assumes that HTML will be returned. I.e., it’s the same as: http://localhost:3000/posts/1.html
Rails can return other formats, e.g., JSON(Javascript Object Notation) capabilities are also provided by default.
Ex. The following request, will be routed to the same controller method as before:
http://localhost:3000/posts/1.json
However, it will be rendered using the file:
./app/views/posts/show.json.builder
and JSON will be returned to the client.
Response Format
One last look at rake routes:
| Prefix | Verb | URI Pattern | Controller#Action |
|---|---|---|---|
| posts | GET | /posts(.:format) | posts#index |
| POST | /posts(.:format) | posts#create | |
| new_post | GET | /posts/new(.:format) | posts#new |
| edit_post | GET | /posts/:id/edit(.:format) | posts#edit |
| post | GET | /posts/:id(.:format) | posts#show |
| PATCH | /posts/:id(.:format) | posts#update | |
| PUT | /posts/:id(.:format) | posts#update | |
| DELETE | /posts/:id(.:format) | posts#destroy |
Redirects
Rails may also respond to an HTTP request using the redirect_to method.
This method actually tells the browser to send a new request for a different URL.
Ex. redirect_to ’www.example.com’
Rails has shortcuts for URLs within your application – they’re the prefix listed when you view routes:
Ex. redirect_to posts_url
will redirect to the index method in the PostsController.
Ex. You can assign a flash message as a part of a redirection:
redirect_to @post, notice: ’Post was successfully created.’
MVC Implementation in Rails
In Rails, the following classes support the MVC design pattern:
Model – The ActiveRecord class, described previously, implements object-relational mappings (ORM).
View – Views and controllers are actually bundled together in Rails in Action Pack. Dynamic content is generated by templates containing embedded Ruby (ERb) code supported by the ActionView class.
Controller – The ActionController class is the core of a web request in Rails. It consists of one or more actions that are executed on request and then either render a template or redirect to another action. An action is defined as a public method on the controller, which will automatically be made accessible to the web-server through Rails Routes.
MVC Interactions in Rails
- The browser sends a request to the web server.
- The web server processes the request, determines which route it belongs to and dispatches that request to the corresponding controller method.
- The controller asks the model layer for all of the information needed to complete the request.
- The model layer collects the requested information and returns it to the controller.
- The controller gives the appropriate information to the view, requesting a particular format.
- The view renders the information in that format and gives it back to the controller.
- The controller assembles the total page’s html and gives it to the web server.
- The web server returns the page to the browser.

Add post’s comments, new comment form, authentication
자세한 소스는 비트버킷의 해당 커밋 부분을 참조한다.
HTML, CSS, Javascript에 대한 개략적인 강의 부분은 블로그를 만들기 위한 직접적인 부분을 제외하고는 이 글에선 모두 생략하였다.
HTML – Forms
완성된 폼을 제출하면(submit), 브라우저에서 돌아가는 user agent에서 먼저 처리된 후 서버 쪽의 processing agent(웹 서버나 메일 서버)에 제출된다.
form 엘리먼트의 기본 구조는 다음과 같다:
<form action="http://www.example.com/log" method="get">
<!-- form controls and other HTML markup -->
<input type="submit" value="Log In">
</form>
action 속성은 폼에서 수집되는 데이터를 받을 서버 사이드의 processing agent의 URL을 지정한다.
method 속성은 데이터를 보내기 위해 사용될 user agent의 HTTP 요청 매서드를 지정한다. HTML user agent는 다음을 지원해야 한다:
- GET – in which case the form data must be sent as part of the URL, i.e., the data is URL-encoded, and appended to the request URL.
- POST – in which case the form data must be included in the HTTP message request body.
Form Submission – GET Request
URL encoding works as follows — the form data is separated from the URI by a “?”, each name/value pair is separated by “&”, and each name is separated from its value by a “=” (“unsafe” characters, e.g., “/” and “&”, are escaped).
Ex.
<form action="http://www.example.com" method="get">
<label>
    First name:<input type="text" name="firstname"><br>
</label>
<label>
    Last name:<input type="text" name="lastname"><br>
</label>
<input type="submit" value="Submit Form">
</form>
Ex. 폼이 제출될 때 웹브라우저 주소창에 일어나는 것:
www.example.com/?firstname=Carol&lastname=Codegood
GET 매서드는 폼이 멱등일 때 사용되어야 한다. 민감한 데이터를 보낼 때는 사용하지 말아야 한다. 폼 데이터가 크거나 아스키 문자가 아니거나 바이너리 데이터일 때도 사용하지 말아야 한다. 파일은 URL로 건넬 수 없기 때문에 파일 업로드 컨트롤을 포함한 폼에서도 사용하지 말아야 한다.
Form Submission – POST Request
서버 사이드 처리가 결합된 폼은 데이터베이스를 변경하거나 서비스 구독 등의 side effect를 일으키기 때문에 POST 매서드를 사용해야 한다. 폼 데이터가 민감하면 HTTPS 프로토콜을 사용해야 한다.
Ex. 매서드 외에는 앞의 예제와 같다:
<form action="http://www.example.com" method="post">
<label>
    First name:<input type="text" name="firstname"><br>
</label>
<label>
    Last name:<input type="text" name="lastname"><br>
</label>
<input type="submit" value="Submit Form">
</form>
POST 매서드인 경우 폼이 제출될 때 주소창의 URL이 변함없고(no URL encoding), 메시지 바디에 매개변수가 포함된다.(크롬 개발자 도구 등을 사용하여 네트워크 트래픽으로 볼 수 있다)
Form Submission Process
The user agent running in the browser identifies the successful controls, and builds a form data set — a sequence of control-name/current-value pairs for the successful controls.
The form data set is encoded by the user agent according to the content type specified in the enctype attribute of the form element.
– application/x-www-form-urlencoded — this is the default, form data is encoded as name-value pairs.
– multipart/form-data — form data is encoded as a message, with a separate part for each control.
– text/plain — form data is encoded as plain text.
The user agent submits the encoded data set to the processing agent running on the server side using the HTTP protocol method specified by the action attribute in the form.
Form Controls
Users interact with forms through named form controls.
Form controls are specified using an input or select element that must appear in the content section of the form element, i.e., between the <form> and </form> tags.
The name of a control is specified using the name attribute.
A control has an initial value and a current value, both of which are character strings. The current value is first set to the initial value, but may change according to user supplied input.
Available form controls include: text, date, buttons, checkboxes, radio buttons, select boxes (drop-down lists), file select boxes, hidden controls, etc.
Form Controls – Buttons
Button controls are specified using either the button element or the input element.
The type attribute, which should always be specified (as different browsers have different defaults for the type), has three possible values:
- submit – Causes the form to be submitted.
- reset – Causes the form to be reset, i.e. all controls are assigned their initial values.
- button – Creates a push button, that typically has a client-side script associated with it through the event attribute. When the button is pressed and released, the associated script is executed.
With the input element, the type attribute may be specified as image. This creates a graphical submit button. The src attribute specifies the URL of the image file that will decorate the button.
Button controls have numerous attributes that support event-driven programming.
This programming style supports interactivity in browsers, i.e., you click a button (an event), the event is processed (typically by running a script) and something happens in the browser window.
Some of the events attributes that can be specified for a button include: onblur, onfocus, onclick, ondblclick, onmousedown, onmouseup, onmouseover, onkeypress, onkeydown, onkeyup, onreset.
For each of these attributes, the value supplied is the script that should run when the corresponding events occurs.
Form Controls – Checkboxes, Radio Buttons
Checkboxes and radio buttons are specified using the input element.
- These are essentially “on/off” switches that can be toggled by the user.
- Several of these controls can share the same control name.
- A switch is “on” when the control element’s
checkedattribute is set. - When a form is submitted, only the “on” checkbox and radio button controls are treated as successful.
- If several radio button controls share the same name, they are treated as mutually exclusive. I.e., when one is switched “on” all of the others with the same name are switched “off.”
- Multiple checkboxes with the same name may simultaneously be switched “on” in a form.
Form Controls – Text Input and File Select
There are two types of text controls, both of them use the input element, and are specified using the type attribute:
-
text– creates a single line text input control. -
textarea– creates a multi-line text input control. The file select control also uses theinputelement, and thetypeattribute has the valuefile. This control allows a user to select a file, whose contents will be submitted with the form.
The password input control uses the input element, and the type attribute has the value password.
With this control, user input is shown in the browser as dots or asterisks.
Form Controls – Select Boxes
Drop-down select boxes are specified using the select element.
- Each choice offered by the menu is represented by an
optionelement, and eachselectelement must contain at least oneoptionelement. Theoptgroupelement allows several of the menu choices to be grouped together. These must appear directly within the select element, i.e., groups in general may not be nested.
Ex.
<select name="selColor">
    <option selected="selected" value="">Select color</option>
    <option value="red">Red</option>
    <option value="green">Green</option>
    <option value="blue">Blue</option>
</select>
Dynamic Content, Templates and Layouts
Controllers and Views
The controller and view in the MVC design pattern are tightly coupled—controllers supply data to views, and controller actions are typically the targets of the links provided in views.
In Rails, a controller makes every instance variable it creates available to the associated view files.
Ex.
– All post are retrieved in the PostsController#index method, and stored in the @posts array.
– In the app/views/index.html.erb file this array is accessed using an iterator:
<% @posts.each do |post| %>
<tr>
    <td><%= post.title %></td>
    <td><%= post.body %></td>
...
</tr>
<% end %>
Dynamic HTML with ERb
In Rails, dynamic content is generated using templates, and the most common templating framework is Embedded Ruby (ERb).
ERb is a filter that takes a .html.erb template file as input and transforms it into an HTML output file as follows:
– Normal HTML content is passed through the filter without modification.
– Content between <%= and %> is interpreted as Ruby code and executed, with the results substituted back into the file as a string in place of the <%= ::: %> string.
– Content between <% and %> (no equal sign) is interpreted as Ruby code and executed, but the results are not substituted back into the output file.
Proper Use of ERb
Although ERb allows you to insert Ruby code into your view, as a matter of good design, use it sparingly!
E.g., in a RESTful architecture, the HTML code in ERb templates should specify the structure of the document, and the Ruby code should be used to provide (dynamic) information specific to particular resources.
Application-level functionality and business logic should never be found in ERb templates.
For generating HTML elements and formatting data in the view, there are numerous Rails helper methods – use them.
Layouts
In order to generate the final HTML file that will be supplied to the browser, a layout file is invoked, passing the template to it as a block.
By default the app/views/layouts/application.html.erb is used. This file is automatically created whenever you create a new Rails application.
Advantage of layouts: By editing one file, and its associated stylesheet, we can change the look and feel of the entire site.
If you want to have different layouts for the different parts of a site, create a layout file that has the same name as the controller you want to associate it with, and place it in the layouts folder.
Ex. app/views/layouts/posts.html.erb
The app/views/layouts/application.html.erb file (note the yield statement):
<!DOCTYPE html>
<html>
<head>
    <title>Blog</title>
    <%= stylesheet_link_tag "application", ... %>
    <%= javascript_include_tag "application", ... %>
    <%= csrf_meta_tags %>
</head>
<body>

<%= yield %>

</body>
</html>
Helper Methods
There are numerous helper methods that are intended to be used in ERb templates. We saw a few in the application.html.erb file.
- The
stylesheet_link_tag()helper method generates HTML<link>tags to the application’s CSS stylesheets. - The
javascript_include_tag()does the same for the application’s scripts. - The
csrf_meta_tags() method is included to prevent cross-site scripting attacks.
Ruby on Rails API에서 actionview:helpers로 검색하여 자세한 설명을 볼 수 있다.
JavaScript and Browser Security
Client-side JavaScript opens up the possibility for authors to deliver malicious scripts to the browser.
Browsers guard against this using two strategies:
– JavaScript code is run in a sandbox that only allows web-related actions to be performed, not general-purpose programming tasks (no writing to disk, creating files, etc.).
- JavaScript code is constrained by the same origin policy – scripts from one website do not have access to information such as usernames, passwords, or cookies from other websites.
Ajax
Ajax was originally an acronym that stood for Asynchronous JavaScript and XML (AJAX).
Ajax deals with how various technologies come together in order to provide a more interactive web browsing experience – it’s not a single technology, but a group of them working together.
XMLHttpRequest (XHR) is an API available to the browser via JavaScript. It’s used to send asynchronous HTTP requests to a web server and then load the server response data back into the script.
In spite of the name, any text data can be retrieved from the server, not just XML. Nowadays, it’s common to retrieve JavaScript Object Notation (JSON), HTML, JavaScript or plain text data.
The data in the script can then be used to alter the current document shown in the browser (through the DOM), without loading a new web page.
Ajax, jQuery & Rails The jQuery library provides a full suite of Ajax capabilities (see: http://api.jquery.com/category/ajax/).
The $.ajax() method is used to initiate an asynchronous HTTP (Ajax) request.
An unobtrusive javascript adapter for jQuery, called jquery_ujs, is automatically provided in Rails.
Using this adapter, forms and links that have the attribute:
data-remote="true"
will be submitted using jQuery’s ajax method, i.e., using $.ajax().
In Rails, you set this attribute using remote: true
Ex.
<%= form_for([@post, Comment.new], remote: true) do |f| %>
Showing a Post & Comments
- Identify the pieces of the page you want to dynamically load using
Ajax. (
show.html.erb) - Create partial templates for the pieces of the page you want to load
dynamically. (
_comments.html.erb) - Modify the form so that it uses Ajax. (
show.html.erb,remote: true) - Modify the controller so that it can respond to a Ajax request.(
comments_controller.rb,respond_to format.js) - Create the JavaScript code that will be returned and dynamically and
executed in the web page. (
create.js.erb)
자세한 소스는 비트버킷의 해당 커밋 부분을 참조한다.
첨언
실제 소스 부분을 보면 알겠지만 실제 블로그를 만들기 위해 직접 작성해야 하는 소스의 량은 몇 십줄도 안된다. 웹앱을 만들때 레일즈를 선호하는 이유를 어렴풋이 알겠다. 그러나, 전체적인 것을 정확히 이해하려면 좀 더 많은 시간을 들여야할 것 같다. 마침 좋아하는 codecademy에 레일즈 강의가 올라와 있어 Learn Ruby on Rails : Codecademy를 통해 좀 더 기본적인 것을 배우려 한다.
코드캐더미 강좌는 여기에 포스팅하였다.